Jobsite Monitoring combines our Intelligent Security with human verification to provide you with complete, trusted jobsite protection.
With Jobsite Monitoring, motion alerts captured by your cameras will be verified by a trained professional before you are alerted. No more alerts in the middle of the night because a raccoon has climbed your fence.
In the event of a verified alert, our trained professionals will contact you within minutes, giving you the option to request emergency services or dismiss the alert. If you do not respond to the agent, emergency services will automatically be sent to your site.
Jobsite Monitoring Cameras
Currently, Jobsite Monitoring is only available on our Fixed 4K IR, 2K IR PTZ, and 1080p IR PTZ cameras. Jobsite Monitoring comes packaged with TrueDeter and TrueShield.
Configuring Jobsite Monitoring
From the Project page, find the project you have Jobsite Monitoring enabled on. From here, click the Configure icon.


Note: TrueLook must enable Jobsite Monitoring on your project first. If you need assistance with Jobsite Monitoring, please contact TrueLook Support.
This will open the configuration to set up the project’s Jobsite Monitoring options.
Alert Summary
Shows the summary of information set up for your Jobsite Monitoring alerts.
If there are any elements that still need to be configured, the “DRAFT – Alerts will not be sent!” message will appear. These will need to be addressed before Jobsite Monitoring Alerts are active and anything is sent to the monitoring center.

If you have not set up a Jobsite Monitoring Alert, you’ll see a screen with a single button to begin setting it up.

To edit an alert that’s already created, open the three-dot menu near the map and select Edit to configure your alert.

Notify Users
The first step determines what actions happen when a security event occurs.

Event Alert Notifications
Determines what actions happen when a security event occurs.
- Notify Customer Call Tree Members: If on, our system will automatically contact people in the directory once a valid alert occurs (an alert that meets the severity level set in the Set Schedule step).
- Notify Monitoring Center: If on, our monitoring center will contact people in the directory if an alert passes the JSM Severity threshold.
- Alert for Non-Threat Events: If on, our system will send alerts for all motion events, regardless of the severity set in the Set Schedule step.
4-Digit PIN Code
In order for the agent to confirm your identification for text and phone calls, there is a 4-digit PIN code that is used. Enter a 4-digit PIN at the bottom of the page. Once a user accepts the assignment in the next step, they will receive a text message with the PIN code to reference when contacted.
The person contacted must provide a PIN to cancel an alert.
Select Users
Authorized people who will be contacted if activity is detected on your jobsite by checking the box in front of their name. All users that meet the alert user criteria will be listed in the selection box.

To be selectable as a contact, they must have:
- Access to Security Recordings in the system.
- Note: Customer Administrators and Project Administrators have the correct security setting by default. Custom roles can be created to have access to Security Recordings.
- A valid US Cell Phone number.
- The ability to receive SMS messages on their cell phone.
If selected as a contact, the user will receive a text message. Each text message expires in 1 hour, so ensure the user is ready and available to respond to the message.
If you do not see a user you expected to see, review their account in User Management.
Alerted Users Order
When multiple applicable users are listed, the monitoring center will contact the first user on the list. If there is no answer, they will move on to the next user, and so on. You are limited to 5 users max for this selection.
To order people on the list, you can drag the users into the order you would like (e.g. Paul Bunyan, the site manager, will now be the first to be contacted).
Select Cameras
On the Select Cameras step, you can select one or more cameras to activate Jobsite Monitoring on (Fixed 4K IR, 2K IR PTZ, and 1080p IR PTZ cameras). You can also set up options for what happens when the camera goes offline, downloading Security Recordings, and if Guard Tour is activated (PTZ cameras only).

To select a camera: Click the checkbox on the camera’s preview image. If you’re unsure of the placement or orientation of your camera for Jobsite Monitoring, contact TrueLook Support.
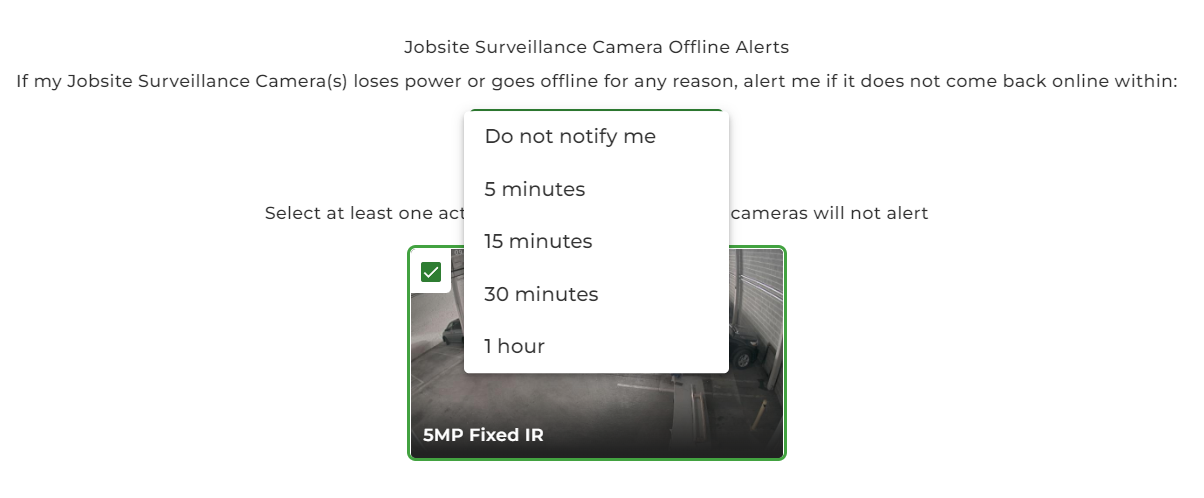
Jobsite Monitoring Camera Offline Alerts
You can select when you receive text messages after a selected Jobsite Monitoring Camera goes offline. You can select one of the following choices:
- Do not notify me
- 5 minutes
- 15 minutes
- 30 minutes
- 1 hour

These times indicate how long the camera should be offline before you are notified (e.g. If you select 15 minutes, your camera will have to be offline for 15 consecutive minutes in order for you to receive an alert).
Note: The Offline Alerts for Jobsite Monitoring Cameras are different from the regular Offline Alerts. You can have both in operation at the same time.
Automatically download movies on Security Recordings
If this option is selected, 10 minutes of footage before the alert is downloaded and saved automatically to your account. Regardless of what’s chosen here, a 15-second clip is sent to the monitoring center when a motion alert occurs.
Guard Tour (PTZ cameras only)
We’ll set up preset positions for the camera to move between, allowing it to monitor the jobsite. This is attached to the hours set on the Jobsite Monitoring scheduler.
For example: The camera will stay at the main preset location for 2 minutes, then it will move to its first set location for 20 seconds, then its second set location for 20 seconds, before returning to its main preset location for 2 minutes and repeating.
Note: Any time-lapses running during the guard tour hours will shut off automatically during that time. It’ll automatically turn back on once the guard tour hours are over.
Verify Address
The next step in the wizard is to verify the correct address for the jobsite. Specifically, this should be the precise address you want the police to respond to in the event of an alert.

Enter address of jobsite for Emergency Services
Enter your jobsite’s address into the fields. This is where any Emergency Services will go to, if called, so ensure that it is accurate.
Instructions for Dispatchers
This field is required. It’s used to give the dispatchers any additional information to share with the police. Examples are gate or alarm codes or instructions specific to the jobsite.
Reposition Pin
If you select this, you can click a point on the map to select an address. The map will drop a pin where you clicked and provide an address. This will be used instead of the address provided above.
Set Schedule
The next step in the wizard is to define the hours you want alerts to be sent. Our cameras perceive motion as an alert, so for an alarm you only want to have this enabled for when motion is not expected on your jobsite. Setting the hours to well outside working hours is recommended.

JSM severity
Select the sensitivity of an alert situation to send notifications on. Events are reviewed by a monitoring center representative, so this is subjective.
- Low – Is there an ongoing crime?
- Medium – Is the person who set off the motion alert not police, security, or a construction worker?
- High – Is anybody on-site during off-hours?
Select Schedule Type
Changes how scheduler below this option is approached. Whether the time you set on represents times JSM is monitoring (armed) or times JSM is not monitoring (disarmed).
Once you have finished entering your alert schedule, click Save Alert.
Pausing Jobsite Monitoring
The Pause feature allows you to prevent Jobsite Monitoring from sending alerts during a scheduled monitoring period. For example: you normally have monitoring all day on Saturday and Sunday, but for the next Saturday morning you would like to pause the monitoring so you and your team can finish up some work from the previous week.
From the Project front page, find the project that you have the Jobsite Monitoring enabled on. From here, click the Pause icon.


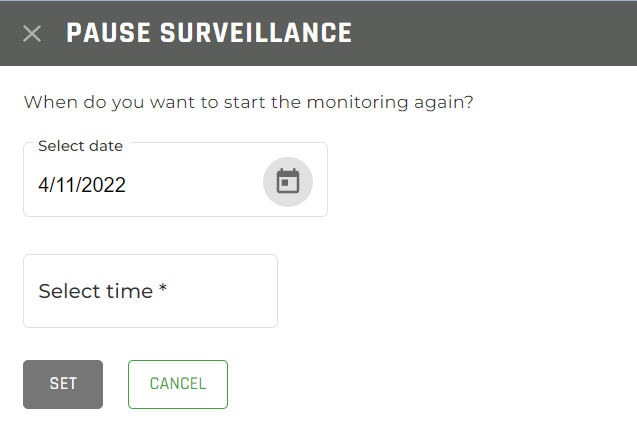
This will open the Pause screen where you will configure the pause options

From here, you can select when you would like the monitoring to begin again.
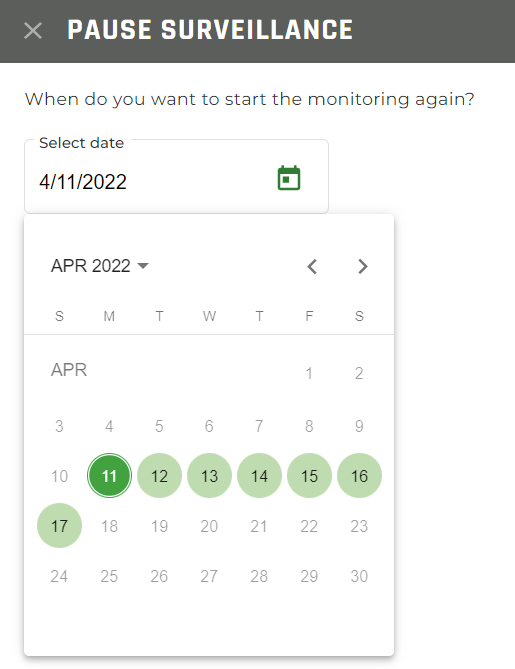
Select the Date
First select a date for monitoring to begin again.

You can select up to 6 days in the future. By default, the current day is selected.
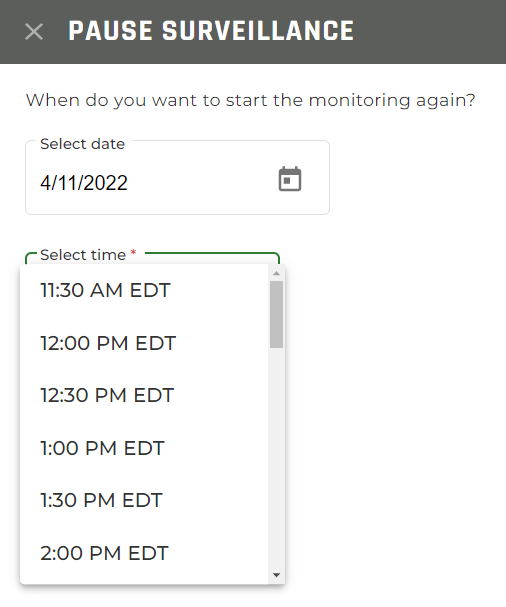
Select the Time
If you select today as the date, then you will only be shown times from the current time to the end of the day in 30-minute increments. If you select any other date, it will show times for the whole day (midnight to midnight).

Once you have selected a date and time, click the Set button and your Pause will be in place.
Then, once the date and time you set for the pause passes, the monitoring will return to its regular schedule.
Resume Monitoring Schedule


If you wish to resume the regular monitoring before your scheduled pause ends, click on the Resume button and your monitoring schedule will begin immediately.