Prior to starting maintenance, please adhere to the following safety guidelines:
- Remove all watches, jewelry, and other conductive materials.
- Wear protective gear like safety goggles, a face shield, rubber gloves, a rubber apron, and footwear to prevent electrical shocks.
- Don’t allow smoking or open flames near the battery compartment.
- Ensure proper ventilation when working on the batteries.
Battery Maintenance Guide
Part 1: Voltage Test
- Check the voltage of each battery with a multimeter; a fully charged battery will be at 6.5V. Take note of which batteries are not fully charged, as they will need to be charged up to full in part 3.
- If batteries are deemed to be in need of replacement, contact TrueLook Support for replacement battery purchasing options.
Part 2: Powering Down Batteries
To safely continue maintenance, you must power down all batteries to ensure they are not charging.
- For trailers with three breaker switches in the battery compartment, power batteries down by turning off all three switches.
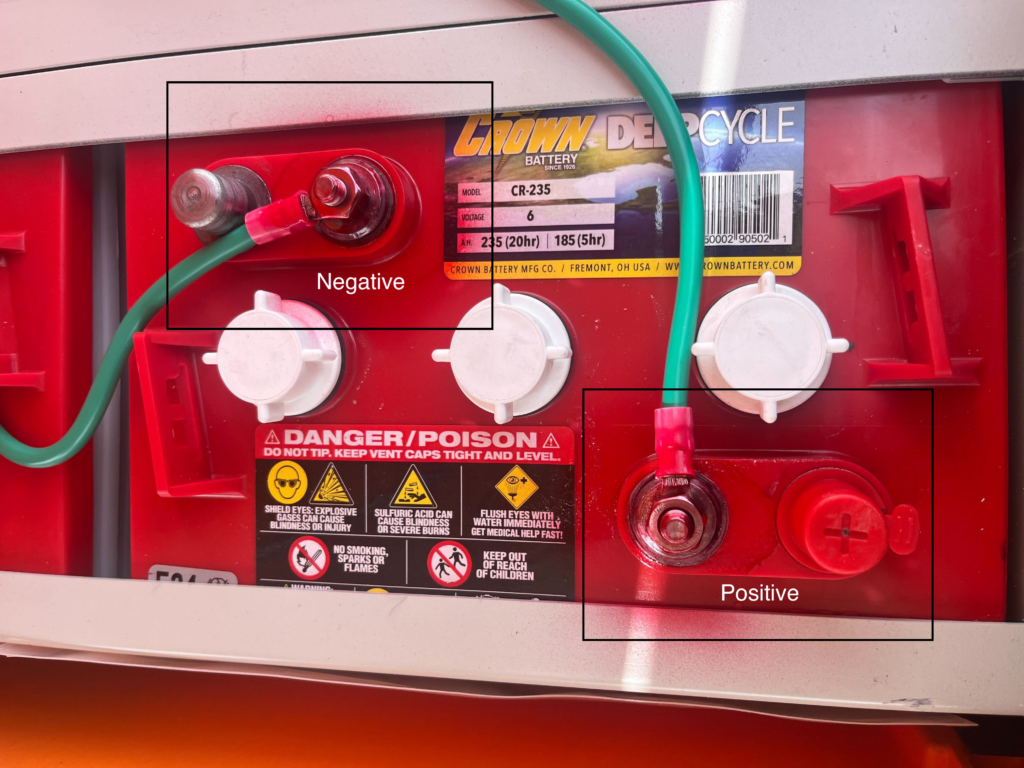
- For trailers without three breaker switches in the battery compartment, remove the nuts coated in red on the positive and negative posts on each battery (see image below) using a 1/2” socket or adjustable wrench. Move the battery connector wires so that they no longer touch the positive and negative posts.
- Warning: Ensure the wrench does not touch the other post while removing, or this will complete the electrical circuit and may cause a shock.

Part 3: Refilling Water
- Ensure the trailer is level by checking the built-in bubble level near the mast. If the trailer isn’t level, adjust the jack stands as needed by turning the handle clockwise to lower and counterclockwise to raise.
- Locate the three white vent caps on top of each battery and open them by rotating counterclockwise.
- Examine the plate at the bottom of the vent well (a flashlight may be needed to see it). Whether it is exposed or under water will determine your next steps.
| Plate Is Exposed | Plate Is Under Water |
|
|
Part 4: Battery Check and Powering Back On
- Check that all battery terminals are clean and corrosion free.
- If battery terminals have corrosion, combine tap water and baking soda in a cup, dip a brush into the solution, and brush at the terminals. Rinse with clean water once the corrosion is gone.
- Check that all battery cables are connected tightly.
- Turn batteries back on.
- For trailers with three breaker switches in the battery compartment, turn on all three switches.
- For trailers without three breaker switches in the battery compartment, move the battery connector wires so that they are on the positive and negative posts. Tighten the nuts back onto each post using a 1/2” socket or adjustable wrench.
- Warning: Ensure the wrench does not touch the other post while removing, or this will complete the electrical circuit and may cause a shock.
Recommended Extra Step: Trailer Mast Maintenance
Spray the winch cable and gears using a general lubricant spray like WD-40. Cycle the winch and mast up and down several times to ensure all parts are free of any bindings and have been coated properly with the lubricant.
Frequently Asked Questions
Why do I have to use distilled or demineralized water?
Other kinds of water, like tap water, contain minerals that may damage your batteries.
Why do I need to charge my batteries before refilling the water?
If the water is filled to the proper level before charging, it will cause an overflow from added electrolytes and damage the battery.
Why does the vent well plate need to be covered in a small amount of water before charging the battery?
The plate being exposed during battery charging causes damage to the battery.
Why does the water need to be filled only to ¼” below the vent well opening?
Too much water in the vent wells can cause charging issues and potentially damage the battery.